
With Just Weeks To Go Until 2022, The Ring of Fire Is Suddenly ROARING To Life
Scientists have been warning us that “the Big One” is way overdue, and at some point time will have run out and it will finally be here.
By Michael Snyder | Guest Writer
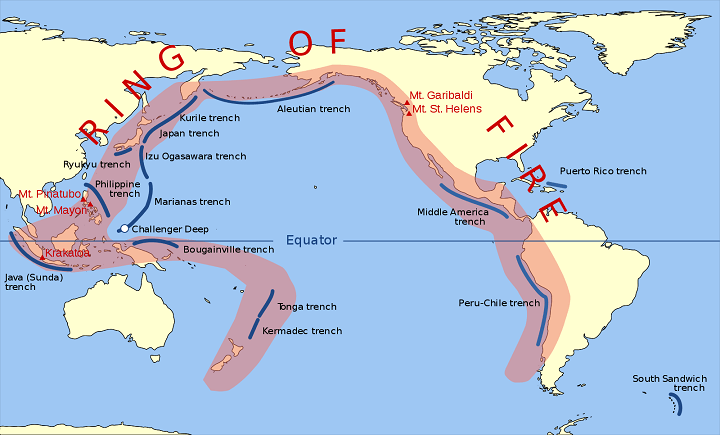
Why are so many earthquake swarms suddenly happening all along the Ring of Fire? For those that don’t know, the Ring of Fire is a series of fault zones that run roughly along the perimeter of the Pacific Ocean. 75% of the Earth’s active volcanoes are located within the Ring of Fire, and it accounts for more than 80% of all global earthquakes. So the fact that the Ring of Fire is starting to become so active should definitely trouble us all.
As I write this, we are less than three weeks away from 2022.
And as I have expressed on numerous occasions, I have such a bad feeling about 2022.
So many pieces of the puzzle are starting to come together, and that includes an alarming rise in seismic activity.
Let me start by discussing what just happened in Oregon. Starting last Tuesday and continuing through Wednesday, we witnessed a very strange swarm of earthquakes along the Blanco Fault Zone…
Nearly 250 miles west of Newport, Oregon, a place called the Blanco Fracture Zone has produced more than 60 earthquakes in 36 hours.
“About 20 of them, oh, we just had another one just now, about 21 of them are over magnitude 4.7,” said Chris Goldfinger of Oregon State University.
The biggest quake in that swarm was a magnitude 5.8, and it had many wondering whether the nearby Cascadia Subduction Zone could be affected.
Needless to say, a major quake along the Cascadia Subduction Zone would be a really big deal, because it could potentially send a giant tsunami slamming into the west coast…
Meanwhile, the Oregon Office of Emergency has warned if a powerful 9.0+ magnitude earthquake originates from the Cascadia Subduction Zone, it could unleash a “tsunami of up to 100 feet in height that will impact the coastal area.”
The state agency adds, “Currently, scientists are predicting that there is about a 37% chance that a mega-thrust earthquake of 7.1+ magnitude in this fault zone will occur in the next 50 years.”
Unfortunately, the odds of such an event happening are much greater than 37%.
And one prominent scientist has just discovered that a major quake along the Cascadia Subduction Zone could also potentially trigger a quake along the San Andreas fault…
The two faults meet in an area known as the Mendocino Triple Junction. Now, Goldfinger has found evidence that a quake on one could trigger a quake on the other, in essence making for one giant seismic event that would span the entire west coast of the U.S.
The new results stem from the analysis of sediment cores from the Mendocino Triple Junction area. Those cores, pulled from canyons on the ocean floor, show evidence of earthquakes in the form of underwater landslides. Using carbon dating, Goldfinger found that nearly a dozen earthquakes occurred throughout history on both faults at the same time.
Let us hope that something like that doesn’t happen any time soon.
Getting back to current events, another disturbing swarm of earthquakes just hit the Rat Islands along the southern coast of Alaska…
The Rat Islands are part of the Aleutian Islands, a chain of volcanic islands, that results from the subduction of the Pacific Plate beneath the North American Plate.
This plate boundary, the Alaska-Aleutian mega-thrust, has been the location of many mega-thrust earthquakes. The latest occurred in on February 4, 1965.
Today, more than 15 earthquakes have rattled the same area.
Of course the entire southern coast of Alaska is included in the Ring of Fire, and at this point the seismic activity up north has become so frequent that it never seems to stop.
Meanwhile, an even more alarming swarm of earthquakes just shook Japan. The following comes from our colleagues over at Zero Hedge…
Quakes first hit Mount Fuji around Dec. 3. The seismic activity continued days later. On Dec. 7, more than 200 quakes were reported across the Tokara Islands. The largest was a 4.8 magnitude.
One poster on the Yahoo Japan news website said, “heard a report that the ‘Big One’ will happen this month, so I am being cautious.”
The Meteorological Agency doesn’t know what is causing the quake storm, but we’ve shown before that quake swarming near a volcano has preceded an eruption (read: here).
How many years have I been warning about Mt. Fuji?
The fact that earthquakes are now shaking the volcano is a very troubling sign.
One of these days Mt. Fuji is going to blow, and when that happens you will not want to be anywhere around.
Speaking of eruptions, volcanoes in Ecuador, Peru, Guatemala, Chile and Indonesia all sent ash high into the sky over the weekend.
Needless to say, all of those mountains sit along the Ring of Fire.
I know that a lot of people don’t like when I say this, but the truth is that our planet is becoming increasingly unstable.
On Friday, we witnessed a very painful example of this here in the United States. The worst tornado disaster in the history of the state of Kentucky killed dozens of people and flattened countless buildings…
More than 80 people in Kentucky were killed after tornadoes ripped across several U.S. states late Friday.
“I know we’ve lost more than 80 Kentuckians. That number is going to exceed more than 100. This is the deadliest tornado event we’ve ever had,” Governor Andy Beshear said on CNN Sunday morning.
You can see video footage of the devastation here and here. Overall, six states were affected by the tornadoes that were spawned, and it has been documented that one family photo was sent flying 130 miles away…
The twisters that spread death and destruction across six states on Friday night were powerful enough to send a family photo flying 130 miles and derail a freight train in western Kentucky, which bore the brunt of the horrific storm.
As the sun rose on Sunday morning, survivors picked through the rubble to salvage anything they could in near-freezing temperatures, still shell-shocked at the scope of death and devastation and many without electricity or running water.
Unfortunately, this is just the beginning.
Our planet is going to continue to become more unstable, and we are going to see more horrific natural disasters in 2022 and beyond.
With the Ring of Fire now becoming so active, those living on the west coast should particularly be on alert.
Scientists have been warning us that “the Big One” is way overdue, and at some point time will have run out and it will finally be here.
About the Author
My name is Michael Snyder and my brand new book entitled 7 Year Apocalypse is now available on Amazon.com. In addition to my new book I have written five others that are available on Amazon.com Lost Prophecies Of The Future Of America, The Beginning Of The End, Get Prepared Now, and Living A Life That Really Matters. (#CommissionsEarned) By purchasing the books you help to support the work that my wife and I are doing, and by giving it to others you help to multiply the impact that we are having on people all over the globe. I have published thousands of articles on The Economic Collapse Blog, End Of The American Dream and The Most Important News, and the articles that I publish on those sites are republished on dozens of other prominent websites all over the globe. I always freely and happily allow others to republish my articles on their own websites, but I also ask that they include this “About the Author” section with each article. The material contained in this article is for general information purposes only, and readers should consult licensed professionals before making any legal, business, financial or health decisions.
I encourage you to follow me on social media on Facebook and Twitter, and any way that you can share these articles with others is a great help. During these very challenging times, people will need hope more than ever before, and it is our goal to share the gospel of Jesus Christ with as many people as we possibly can.